Hair Transplant Treatment Steps
-
Step 1: Designing a new hairline
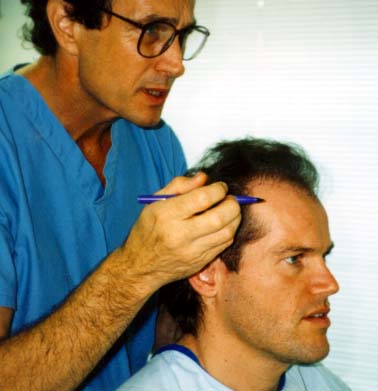 On the day of your procedure, we review our surgical plan created during the initial consult. This is a critical part of the procedure and one that should not be rushed.
The design of your hair restoration takes into account a number of concepts. The plan should detail the outcome expected in one year, and also must take into consideration the balding that can take place over the rest of your life. The most important concept to understand in hair transplantation is the issue of limited supply. Simply put, there is a limited/finite number of follicular units in the donor area available for transplant.
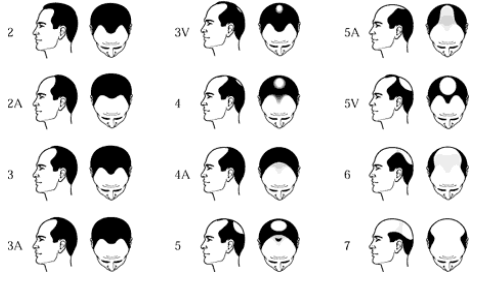 Generally speaking, the more excessive the presenting hair loss and the younger a person is, the more he/she has to consider this limitation in supply. It is unlikely that a person can accomplish high density throughout his scalp, with a “low hairline” (no recession in the temporal area) and complete coverage of the crown (back of the head), if it is predicted that he will go on to an advanced level of hair loss such as a stage 7. (See the FAQs for a diagram defining these stages of balding.) It is critical to understand that the artwork must respect the limited supply in order to create a natural result which will stand the test of time. The older you are and the less hair loss you present with, the less the artistic design has to compromise, as you are less likely to proceed to an advanced stage of balding in your lifetime.
 -
Step 2: Preparing the donor area
 The more hair that has to be moved to accomplish our desired goal, both now and in the future, the more important the plan for the donor area. The “lifetime” or “Safe Donor Area (SDA) refers to a roughly 3 inch tall band of hair bearing scalp that wraps around the back portion of your head. The follicular unit count contained in an average 1 cm x 22 cm ellipse that is excised from within this donor zone averages 2500 Follicular units. The actual size of course could be less, and depends upon the size of your individual scalp characteristics. Just that area to be excised is shaved to about 3mm in length. After excision, the incision site is closed. In our practice technique when the patient leaves the office following surgery, there is virtually no indication he or she had any procedure performed on casual inspection of the back of their head.
 -
Step 3: Anesthesia, Harvest and Donor Closure
During this phase of the procedure, the surgical area is anesthetized with local anaesthetic so that the entire surgical area is numb. This process takes about two minutes. The area chosen for your donor strip is defined, hair above this area is lifted up, the strip is excised, and the area is closed using traditional plastic surgery closure techniques. Overall the entire donor harvest process takes about 30 minutes, and is very well tolerated by virtually all patients. Following the removal, the hair is combed back into place, and is undetectable on looking at the back of the head.
In general, follicular unit grafts obtained by dissection from a donor strip under direct microscopic visualization are far superior in terms of robust and long lasting growth than standard FUE grafts, regardless of the means of extraction (Manual, Robot-assisted, or Suction based methods). Understanding this is of critical importance in realizing the maximum benefit of Modern Hair Transplantation Surgery.
-
Step 4: Preparing the Recipient sites
 Dr Carman’s artistry is reflected in the wide variety of surgical tools he utilizes in the creation of his patient’s recipient sites. From hollow core needles and microtomed blades to custom cut surgical blades, Dr Carman personally creates instruments made-to-fit the specific follicular size of each and every patient on the day of surgery. Here attention to detail is critical, and the work is, in the words of Dr Carman, “The perfect blend of science and art”. The patient sits comfortably in the reclining position during this process with access to a flat screen TV, Movies as well as the internet. Patients are free to use the restroom, take a stretch, etc as they are require.
 -
Step 5: Preparing the Grafts
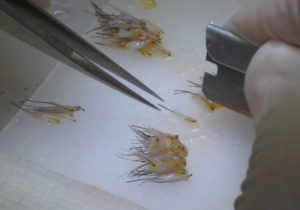 Technically, the graft preparation is is both meticulous and exacting. The hair bearing tissue must be keep cool and hydrated at all times during the dissection process. The storage solution utilized is specifically designed for hair transplantation, and Dr Carman has further refined it’s role in providing a supportive environment by further enriching the solution through the additional supplementation of stabilizing factors including ATP and additional co-factors.
The photo to the right shows FU grafts prepared from the donor ellipse which was slivered, crosscut and trimmed under a dissecting microscope to produce individual cylinders of tissue (the naturally-occurring “Follicular Units”) that contain clusters of 1,2,3 and rarely, 4 hairs. To date, there is no other extraction method (including FUE) which produces the quality and longevity of the Follicular Unit Graft as well as dissection under direct microscopic examination of the donor tissue.
-
Step 6: Placing the grafts
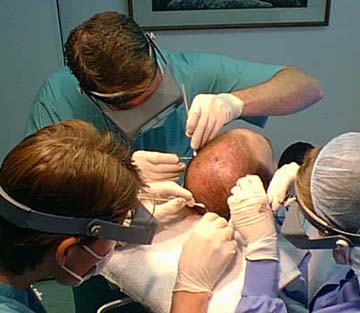 Placing the grafts requires experience and a refined touch of the hand. The doctor and surgical technicians need to have fine dexterity and must be unhurried and well rested to reproduce consistent, high quality results. We take pride in our one-case-a-day approach as well as in the experience of our staff. By focusing our attention on one patient per day you will receive the individual attention you deserve for one of the most important and more satisfying decisions that you will make in your lifetime. Simply put, in hair restoration, there simply is no substitute for quality work and dedication to detail.
 -
Step 7: Application of Dressing
Prior to your discharge after surgery, the donor and recipient areas are dressed in a loosely fitted bandage, and your post-operative directions are reviewed. A loose fitting cap will easily conceal the dressing. Virtually all of our patients leave pain free and in good spirits, having finally accomplished what has become a great milestone in decision-making after responsible due diligence and a long day of surgery!!!!
-
Step 8: Next Day Wash and Dry

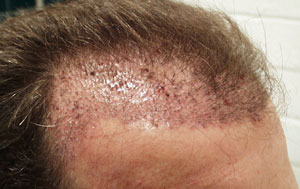
Above is a typical next day appearance of a patients scalp.
The day following surgery we will see you in the morning for your post op check. Here we will review the post operative instructions, answer any questions you may have, and address the surgical area. We will remove the surgical dressing and rinse the grafted and donor areas to remove post-operative residue and assess your immediate post-operative results.
-
Step 9: Recovery Timeline
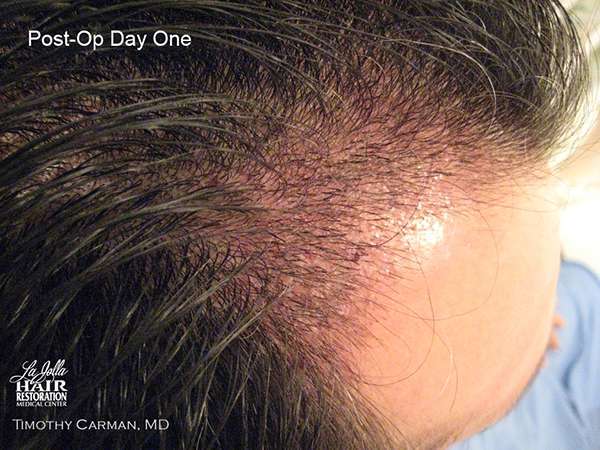 Day After
In addition to the location and whether preexisting hair is present for coverage of the grafted area, several other factors should be discussed. Note in the picture the front zone of single hair follicular units. The more visible grafts behind the one hair follicular zone are 2 to 3 hair FU grafts. At this early stage you can see that the scabbing at the base of the grafts is very minimal, if present at all. Scabbing will develop over the next 48 hours.This picture shows a typical appearance of a transplanted scalp the first day after the procedure. How conspicuous the appearance is depends upon where the grafts are placed and if there is preexisting hair to provide coverage of the grafts.
The scabs take from 7 to 14 days to fall off depending upon a number of variables from patient to patient. The usual time for the skin to be free of the scabs and to have only stubble from your new grafted hair is 7-10 days.
Pain after the transplant is much less than you might expect. Although people’s pain thresholds vary, the overwhelming majority of rate the severity of the discomfort as a 3 out of 10. This is well controlled with medications, and tapers quickly over the following two to three days.
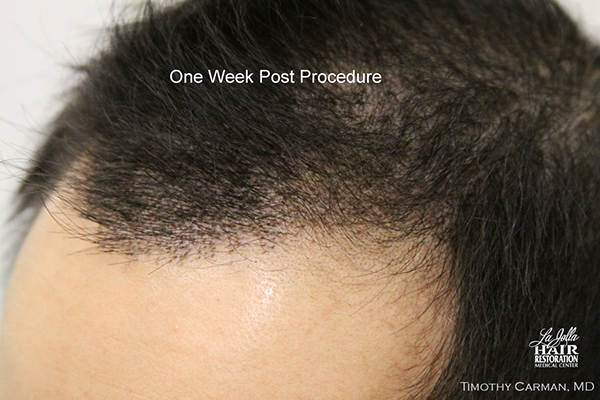 One Week
At one week you will be ready to have your sutures removed. The scabs are usually well defined, small, and well on their way to loosening up and flaking off. There is variable degrees of redness of the scalp. The redness generally disappears after three weeks if you have some pigmentation to your skin but can last three to six months if you have a lighter complexion.
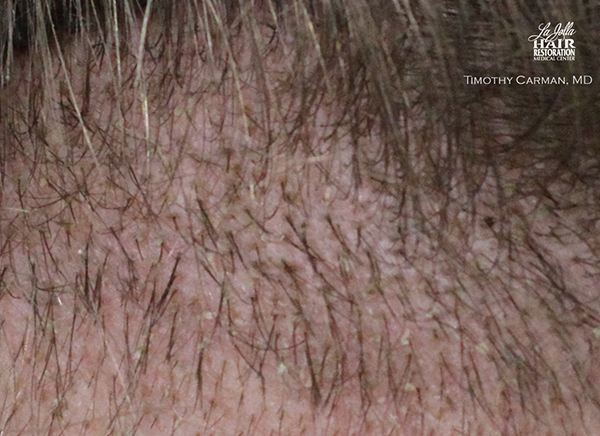
At two to three weeks, scabs are flaky and translucent, and redness has subsided.
Three Weeks
At three weeks the scabs have usually flaked off, and the redness of the scalp, when present, continues to fade. The stubble of your newly grafted hair has continued to grow to this point. It now begins to fall out as the transplanted hair follicles experience transplant shock and go into the resting phase of growth.
In a minority of patients, a small percentage of transplanted hair may not fall out, and keeps growing. It’s a good idea, however, to be prepared for the more common scenario, because most hair usually does go into this resting phase. It is important to realize that some of the hair adjacent to the transplanted grafts can go into the resting phase as well. Therefore, this period beginning at three weeks and ending at three to four months post-op can have at least as thin an appearance as before your procedure. A little patience is required here!
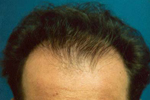 Four Months
Good growth should usually be apparent by 4 months. It often starts by 3 months. The decreased sensation to touch in the grafted area should be considerably improved. At no point are you aware of the numbness unless you reach up to your scalp and test for feeling. The donor scar will still have more pinkness than it will at six months.
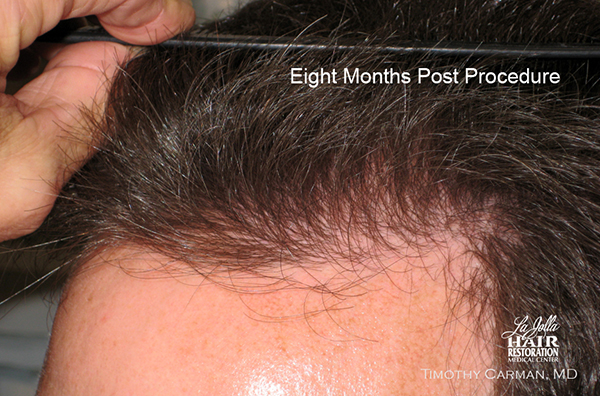 Six to Eight Months
At 6 months you will have 60 to 70% of your grafted follicles actively growing. This is the point where generalized comments about your appearance are not uncommon. “Have you lost weight?”, or, “You look well-rested! ” -are typical comments our patients report. As the appearance of density is an exponential phenomena, there is a very nice overall improvement over the next few months.
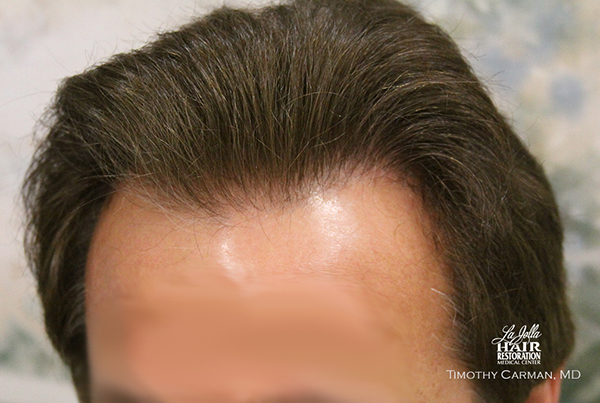 Eighteen Months
By Eighteen months after surgery, any variability in growth rates between patients have become equalized, as all of the transplanted follicles have fully matured. All of the newly grafted and pre-existing hairs will have been cut and styled, usually in a fashion that the patient has not been able to experience for many years prior to the procedure! This is what now can be considered the final result in appearance
Contact Us to Learn More
We hope you gained some useful information from our hair restoration FAQ in La Jolla page. If you still have additional questions, you can simply click to contact La Jolla Hair Restoration!


